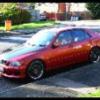
aztecbandit1 Posted August 13, 2009 Report Share Posted August 13, 2009 Thought i'd start a thread about my Skyline that i brought after my Lexus IS200 had a bit of a fire Going to be probably more pics than there is writing The car and a bit about it, Model...... 1995 Nissan Skyline R33 GTS-T Spec 1.5 (change over model) Engine .... RB25 Single Turbo, Power at the moment.... 258.3bhp at the hubs around 310bhp at the Fly, Mods so far .... Ultralite alloys 8.5" front 9.5" rear, Splitfire DI Power Coil Packs, Iridium Plugs, Full Decat Exhaust System, Lowered 25mm all round, Rear lit skyline panel, Double din dvd player, Apexi Sport induction kit, single stage boost, stainless relay box cover, stainless rad panel, stainless pas bottle cover, polished intake pipe, silicone hoses,CLIFFORD CAT1, tuned by ART Tuning! more to come soon This is how i got the car in May, And the day after when i had given it a wash and a bit of a clean up.. The first mod that i did was the rear skyline panel, had seen a few skyline with the rear panel lit up when the lights were on so thought i'd do it to mine.. This is after i'd sanded and taped up the skyline lettering. After the respray and the light set fitted, refitted to the car, you can see in the pic's above how it used to look on the car before i sprayed it.. Quote Link to comment Share on other sites More sharing options...
aztecbandit1 Posted August 13, 2009 Author Report Share Posted August 13, 2009 The next thing i did was to refit the double din dvd player in the car, as the one that was fitted used to turn off when i turned the lights on? so i had to listen to the engine instead at night Also refitted the boost gauge by the steering wheel as the one that was there didn't work? Not the best of pics but you can see it fitted in the centre console. The day after i thought i'd give it a bit of a polish to see how it would come up, Not too bad but going to give it a good going over with my polisher when i get chance? The next little job was to paint the calipers, went for a nice red on this one, Easy job but quite effective and still got to paint the lettering on them? So with the outside looking a bit better i've now moved onto the engine bay, got so much to do on this one but started with polishing the intake pipe, This is after i'd degreased it, After a good sanding down, After its 2nd going over with my polishing gear, And how it looks now, Quote Link to comment Share on other sites More sharing options...
aztecbandit1 Posted August 13, 2009 Author Report Share Posted August 13, 2009 Still in the engine bay, i added a few of the stainless covers that i have..Rad panel, pas bottle cover and the relay box cover, I also replaced the coil pack cover to tidy it up a little and refitted the intake pipe that i polished? Next little job was to clean some of the brackets up ready for polishing, Before. After Before and after Going to polish these when i get some more polishing supplies? Something that bugged me since i brought the car was the handbrake gaitor, so thought i'd make a new one, The one that was fitted, badly worn and ripped, And the new one i made using the old framework, (yes i can sew too ) Strut brace fitted, Quote Link to comment Share on other sites More sharing options...
aztecbandit1 Posted August 13, 2009 Author Report Share Posted August 13, 2009 Next little mod that i did was again something i'd seen on nearly all other skylines but not on mine due to it having a rear fog light conversion? So thought i'd do the twin afterburner rear light setup, Before with the single lights, And now with the twin rear lights, Back to the engine bay? Resprayed the coil pack cover a nice aztec fire red with black panel and decal applied, And polished a couple of the smaller pipes just above the cover, Also started to clean up a few of the other metal parts like the CAS and the plenum chamber, both have been sanded down ready for polishing Going to re-polish the intake pipe soon as i've now given it another sanding down, i wasnt happy with the finish so its looking a bit dull in those pic's? Started to replace a few of the hoses today with red silicone, used over 4 meters so far and still got loads to do How the engine bay looked before, Not a bad start so far but still got loads to do and its starting to look better Quote Link to comment Share on other sites More sharing options...
Mat Posted August 13, 2009 Report Share Posted August 13, 2009 wow, such an improvement, amazing how the little things add up to be impressive...nice one matey Quote Link to comment Share on other sites More sharing options...
aztecbandit1 Posted August 13, 2009 Author Report Share Posted August 13, 2009 wow, such an improvement, amazing how the little things add up to be impressive...nice one matey Thanks mate, got lots to do yet and hopefully i'll soon have the FMIC for it Quote Link to comment Share on other sites More sharing options...
Rich Posted August 13, 2009 Report Share Posted August 13, 2009 You have been busy! She's looking very nice mate, a credit to you, can't wait to see what you do next Quote Link to comment Share on other sites More sharing options...
aztecbandit1 Posted August 13, 2009 Author Report Share Posted August 13, 2009 You have been busy! She's looking very nice mate, a credit to you, can't wait to see what you do next Thanks matey, Hopefully the next things i'll be doing is polishing the rocker covers, plenum, intake pipe (again) and some of the brackets that i've prepped plus anything else i can get off so maybe do the alternator aswell Also going to strip the side skirts off to respray them, along with the front and rear bumpers due to some nice person scraping both within 2 days and doing a runner, leaving me with cracked paint and scratches Quote Link to comment Share on other sites More sharing options...
jammy Posted August 13, 2009 Report Share Posted August 13, 2009 very nice mate...gissit...il give you me corsa Quote Link to comment Share on other sites More sharing options...
Rich Posted August 13, 2009 Report Share Posted August 13, 2009 You have been busy! She's looking very nice mate, a credit to you, can't wait to see what you do next Thanks matey, Hopefully the next things i'll be doing is polishing the rocker covers, plenum, intake pipe (again) and some of the brackets that i've prepped plus anything else i can get off so maybe do the alternator aswell Also going to strip the side skirts off to respray them, along with the front and rear bumpers due to some nice person scraping both within 2 days and doing a runner, leaving me with cracked paint and scratches Nice one, how do you polish them then, any special tools? Shame about the bumpers, some inconsiderate drivers out there! very nice mate...gissit...il give you me corsa Mate you would be dangerous in one of these, stick to the corsas! Quote Link to comment Share on other sites More sharing options...
Tony Posted August 13, 2009 Report Share Posted August 13, 2009 very nice mate...gissit...il give you me corsa Now that must be tempting Quote Link to comment Share on other sites More sharing options...
Tony Posted August 13, 2009 Report Share Posted August 13, 2009 Nice blog Aztec People say "why" are you polishing this or that but what they don't imagine is the collective result.... Looks absolutely stunning young man Quote Link to comment Share on other sites More sharing options...
Noel Posted August 13, 2009 Report Share Posted August 13, 2009 Nice one ... well wear Quote Link to comment Share on other sites More sharing options...
aztecbandit1 Posted August 13, 2009 Author Report Share Posted August 13, 2009 Thankyou Tony Not sure if any of you guys saw the effort i put into my IS200 over on the LOC? I used to make nearly everything i could for it, used to spray all my own parts, fit them, service the car and do basicly everything i could to it just as a hobby, always loved to make and play with things on my motors as it gives me something to do, and when i've done it i can say i did that, even though one of the main reasons was that i couldnt afford for someone else to do it for me or to buy the parts off the shelf, so i'd DIY most things? Heres some pics of my lex before it went up in flames! some of the bits i made for it, Gauge pod.. Stainless pas and brake fluid bottle covers. Induction kit the side skirts i sprayed at home, Alloy wheels i refurbed and then i polished the rims, Exhaust manifold. The supercharger kit, that i did again (bazza originally polished the main part) and a few bits i polished, pipes, manifold and covers, The engine bay as a whole with the top engine cover i made, Just an example of the things i get up to in my spare time hoping the Skyline will get to a pretty good standard with me doing a lot of the work again? Anyway thats enough of the old motor, on with the new one Quote Link to comment Share on other sites More sharing options...
Tony Posted August 14, 2009 Report Share Posted August 14, 2009 The Lex was a babe, many in LOC were heartbroken for you when she went up in flames..... Still that was then, this is now so get on with your tinkering Quote Link to comment Share on other sites More sharing options...
aztecbandit1 Posted August 14, 2009 Author Report Share Posted August 14, 2009 The Lex was a babe, many in LOC were heartbroken for you when she went up in flames..... Still that was then, this is now so get on with your tinkering I did a bit more engine polishing today by starting to polish the rocker covers, but going to wait till i get a new set of rocker gaskets and whip them off so i can do them properly, also polished the top pipe again so its looking a bit better now than it did but god does my back ache now Another pic, bet your getting fed up of them now You can see the polished finish better on the right hand side rocker cover with the reflection of the pipework in? Quote Link to comment Share on other sites More sharing options...
Rich Posted August 14, 2009 Report Share Posted August 14, 2009 Looks stunning mate, will never tire of seeing your photos So what you using to polish these parts? Quote Link to comment Share on other sites More sharing options...
aztecbandit1 Posted August 14, 2009 Author Report Share Posted August 14, 2009 Looks stunning mate, will never tire of seeing your photos So what you using to polish these parts? Cheers matey, I use a polishing kit i brought of ebay with a power drill at the moment, but have just got hold of a bench grinder so i'll be able to get a better finish on the parts? I'm also after a flexi shaft kit for the drill and grinder so i can do smaller parts and get into tight places, Its pretty easy to do and doesn't take too long when you get going, I usually start off by giving the part a good rub down with some sandpaper and some of the green brillo pads to give it a semi shiny finish, then start with a coarse polishing paste with a firm wheel and usually do a 4 stage polish going from a coarse to medium then to fine paste, and usually finish off with a good coat of autosol metal polish, i use 3 different types of polishing wheel one firm one medium and then a soft one for the final finish This is like the kit i use that i had off ebay, CLICK ME! Think the hardest part i've polished so far was the Lexus alloys,(pic above) they were a right pain to do Quote Link to comment Share on other sites More sharing options...
djwozza Posted August 14, 2009 Report Share Posted August 14, 2009 Fantastic work Chris Quote Link to comment Share on other sites More sharing options...
aztecbandit1 Posted August 14, 2009 Author Report Share Posted August 14, 2009 Fantastic work Chris Hello mate cheers its getting there Quote Link to comment Share on other sites More sharing options...
P4UL T Posted August 15, 2009 Report Share Posted August 15, 2009 Looks great Chris, well done, I wish I had the skills and time to tidy up my car Quote Link to comment Share on other sites More sharing options...
Rich Posted August 15, 2009 Report Share Posted August 15, 2009 Looks stunning mate, will never tire of seeing your photos So what you using to polish these parts? Cheers matey, I use a polishing kit i brought of ebay with a power drill at the moment, but have just got hold of a bench grinder so i'll be able to get a better finish on the parts? I'm also after a flexi shaft kit for the drill and grinder so i can do smaller parts and get into tight places, Its pretty easy to do and doesn't take too long when you get going, I usually start off by giving the part a good rub down with some sandpaper and some of the green brillo pads to give it a semi shiny finish, then start with a coarse polishing paste with a firm wheel and usually do a 4 stage polish going from a coarse to medium then to fine paste, and usually finish off with a good coat of autosol metal polish, i use 3 different types of polishing wheel one firm one medium and then a soft one for the final finish This is like the kit i use that i had off ebay, CLICK ME! Think the hardest part i've polished so far was the Lexus alloys,(pic above) they were a right pain to do Thanks for the link, the kit is not as expensive as I thought it would be How long do the compounds last? I use autosol polish on my tailpipes with wire wool, it's a good polish. I remember seeing the lexus at the WIM open day and LOC day...alot of work went in to that, shame about the fire Quote Link to comment Share on other sites More sharing options...
Gordon Posted August 15, 2009 Report Share Posted August 15, 2009 Nice work Chris i like your rear end in the dark Quote Link to comment Share on other sites More sharing options...
dazz33 Posted August 15, 2009 Report Share Posted August 15, 2009 Chris you have done some great work the car looks awsome...keep the good work up.. Quote Link to comment Share on other sites More sharing options...
aztecbandit1 Posted August 15, 2009 Author Report Share Posted August 15, 2009 Looks stunning mate, will never tire of seeing your photos So what you using to polish these parts? Cheers matey, I use a polishing kit i brought of ebay with a power drill at the moment, but have just got hold of a bench grinder so i'll be able to get a better finish on the parts? I'm also after a flexi shaft kit for the drill and grinder so i can do smaller parts and get into tight places, Its pretty easy to do and doesn't take too long when you get going, I usually start off by giving the part a good rub down with some sandpaper and some of the green brillo pads to give it a semi shiny finish, then start with a coarse polishing paste with a firm wheel and usually do a 4 stage polish going from a coarse to medium then to fine paste, and usually finish off with a good coat of autosol metal polish, i use 3 different types of polishing wheel one firm one medium and then a soft one for the final finish This is like the kit i use that i had off ebay, CLICK ME! Think the hardest part i've polished so far was the Lexus alloys,(pic above) they were a right pain to do Thanks for the link, the kit is not as expensive as I thought it would be How long do the compounds last? I use autosol polish on my tailpipes with wire wool, it's a good polish. I remember seeing the lexus at the WIM open day and LOC day...alot of work went in to that, shame about the fire Funny enough i was looking through one of your topics last night and my lex is in a couple of your pics The polishing pastes last quite well, but if you have a search round on ebay you can get other kits with a lot more stuff in them and you can also buy the bits on there own which sometimes works out cheaper? here's a link to give you an idea how to start polishing, Polishing Guide CLICK ME! Quote Link to comment Share on other sites More sharing options...

Recommended Posts
Join the conversation
You can post now and register later. If you have an account, sign in now to post with your account.