Invisible Touch Detailing Posted April 29, 2012 Report Share Posted April 29, 2012 Here we have an F430 Spyder booked in for a stage 1 paint enhancement plus a few extras. The car was trailored over to me and unloaded. These were the first pictures on inspection of the vehicle... Quote Link to comment Share on other sites More sharing options...
Invisible Touch Detailing Posted April 29, 2012 Author Report Share Posted April 29, 2012 Lots of previous polish residue Headrest clips had been rubbing on the paintwork Quote Link to comment Share on other sites More sharing options...
Invisible Touch Detailing Posted April 29, 2012 Author Report Share Posted April 29, 2012 Into the engine bay The first task was to use APC and fine brushes to clear the polish and clean all the tighter areas before washing Quote Link to comment Share on other sites More sharing options...
Invisible Touch Detailing Posted April 29, 2012 Author Report Share Posted April 29, 2012 The hood was then cleaned, also using APC and then protected with 303 The engine bay was then degreased with APC and Engine/Machine Cleaner. Lightly rinsed off and engine then run for 5 mins The car was then snowfoamed and washed using the 2 bucket method with Shampoo Plus. The wheels at this stage were not done as they were to be removed. After being jetwashed, the vehicle was returned to the garage to be clayed. Following a second wash outside, the vehicle then returned to the garage to be dried Now the car was clean and contaminent free, the paintwork was inspected under halogen and led lighting Quote Link to comment Share on other sites More sharing options...
Invisible Touch Detailing Posted April 29, 2012 Author Report Share Posted April 29, 2012 Quote Link to comment Share on other sites More sharing options...
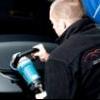
Invisible Touch Detailing Posted April 29, 2012 Author Report Share Posted April 29, 2012 Paint thickness readings were then taken. Even with a single stage polish, this is very important to ensure what levels you have to work with The drivers wing was taped up in preperation, ensuring any badges, rubbers, seals etc were protected Using a 3M polishing pad and backing plate for control, Menzerna 106FA as the primary polish with a small drop of Menzerna 85RD in the centre of the pad, the paint polished like butter and was a joy across the entire car. The following results were achieved on the front wing. From this To this Quote Link to comment Share on other sites More sharing options...
Invisible Touch Detailing Posted April 29, 2012 Author Report Share Posted April 29, 2012 Moving onto the drivers door The rear wing. The vents in the wings and sideskirts were polished at a later stage, using smaller spot pads for more precise, safer work in a tighter area Quote Link to comment Share on other sites More sharing options...
Invisible Touch Detailing Posted April 29, 2012 Author Report Share Posted April 29, 2012 Working around the car The difference in the wing and vent area clearly visable Moving onto the door Then the front wing Quote Link to comment Share on other sites More sharing options...
Invisible Touch Detailing Posted April 29, 2012 Author Report Share Posted April 29, 2012 The front bumper after polishing The boot after polishing Onto the rear bumper Quote Link to comment Share on other sites More sharing options...
Invisible Touch Detailing Posted April 29, 2012 Author Report Share Posted April 29, 2012 The roof was then folded away to allow the areas underneath to be machined Changing to a smaller spot pad, i proceeded with the wing mirrors, A pillars, vent areas and paintwork inside the car where the rear seats had been rubbing. The vents on the rear wings were treated inside with 303 Each panel was ipa'd after polishing. Swissvax Cleaner Fluid was applied once all machining was complete to ensure a completely clean surface and prepare the paint for Swissvax Best of Show Wax Quote Link to comment Share on other sites More sharing options...
Invisible Touch Detailing Posted April 29, 2012 Author Report Share Posted April 29, 2012 The wheels were then removed to be fully cleaned, polished, ipa'd and then sealed with Poorboys Whilst the wheels were off, the hubs were painted black to cover up the red they had previously been painted Moving into the engine bay, all rubbers were treated with 303 and then all surfaces also treated with Best Of Show The exhaust was polished with NXT These were the completed pictures of the engine bay Quote Link to comment Share on other sites More sharing options...
Invisible Touch Detailing Posted April 29, 2012 Author Report Share Posted April 29, 2012 The rear diffuser was also treated with Best Of Show The wind deflector was filthy and really impacting vision. This was removed, fully cleaned and replaced Previous polish on the rear brake light was removed with APC All glass was cleaned inside and out with 3M Glass Cleaner The interior and boot were hoovered and dusted down. The dashboard and plastics were then treated with Natural Look Any exterior rubbers, plastics and door/boot seals were treated with Bumper Care The following day, Zaino Z8 was applied to all paintwork, a panel at a time, evenly spread and buffed using several clean microfibres to further enhance the gloss, depth and add further protection to the vehicle. This product added an extremely noticeable difference to the overall appearance Quote Link to comment Share on other sites More sharing options...
Invisible Touch Detailing Posted April 29, 2012 Author Report Share Posted April 29, 2012 Meguiars Endurance gel was applied to the tyres These were the final pictures Quote Link to comment Share on other sites More sharing options...
Invisible Touch Detailing Posted April 29, 2012 Author Report Share Posted April 29, 2012 Quote Link to comment Share on other sites More sharing options...
Invisible Touch Detailing Posted April 29, 2012 Author Report Share Posted April 29, 2012 Quote Link to comment Share on other sites More sharing options...
Invisible Touch Detailing Posted April 29, 2012 Author Report Share Posted April 29, 2012 The owners service book was completed to accompany his existing mechanical service history, and placed on the passenger seat The 430 was then wrapped under a sheet whilst we waited for the british weather to sort itself and the car could be trailored away, ready for an exciting road trip the owner had planned Hope you enjoyed the read, more to come from Invisible Touch Detailing soon... Regards, Christian Quote Link to comment Share on other sites More sharing options...
scorps Posted April 29, 2012 Report Share Posted April 29, 2012 Awesome work as usual, who in their right mind painted the hubs Red, Ferrari or the owner? Black is much better Quote Link to comment Share on other sites More sharing options...
Invisible Touch Detailing Posted April 29, 2012 Author Report Share Posted April 29, 2012 I'm not sure if it was done at Ferrari or the previous owner himself, but it did look naff. Hubs can only be black or silver imo Quote Link to comment Share on other sites More sharing options...
Tango Posted April 29, 2012 Report Share Posted April 29, 2012 Damn it Christian, I just drooled on my keyboard Quote Link to comment Share on other sites More sharing options...
Rich Posted April 29, 2012 Report Share Posted April 29, 2012 Awesome work Christian, looks stunning Those paint readings seem quite high, is Ferrari paint normally thick? Also what do you use to clean the inside of the wheels as you always seem to get them spotless or is it more elbow grease than product? Quote Link to comment Share on other sites More sharing options...
parthiban Posted April 30, 2012 Report Share Posted April 30, 2012 Those paint readings seem quite high, is Ferrari paint normally thick? I was wondering about the paint readings too, but a slightly different question to ERs! Probably a numpty question but what actually makes a good or bad paint reading? And with the work you do how much paint thickness is likely to be actually removed? Quote Link to comment Share on other sites More sharing options...
Rich Posted April 30, 2012 Report Share Posted April 30, 2012 From what I know (correct me if I'm wrong Christian) normal paint thickness is between 100 - 200, under 100 and you need to be cautious, especially when it starts getting low as 80. A thick reading (over 200) could be a sign of a respray, which is what I thought when I saw those, especially the one over 800 but Christian didn't mention anything. When correcting a car you will probably remove only a few microns of clearcoat (paint on a single stage), the more abrasive the polish and pad combo the more you will remove. This is why it's always recommended to start with the polish and pad that has the least amount of cut and work your way up. Bodyshops will just compound the paint and remove lots of clearcoat without a thought about preserving the original paint. Detailing is about correcting the paint by removing a minimal amount of clearcoat. Quote Link to comment Share on other sites More sharing options...
scorps Posted April 30, 2012 Report Share Posted April 30, 2012 Should be in Gold! and give a price the customer paid, would be nice to know how much per job. Quote Link to comment Share on other sites More sharing options...

Recommended Posts
Join the conversation
You can post now and register later. If you have an account, sign in now to post with your account.