

Invisible Touch Detailing
-
Posts
294 -
Joined
-
Last visited
-
Days Won
1
Content Type
Profiles
Forums
Calendar
Gallery
Everything posted by Invisible Touch Detailing
-
 Here we have Steve's Big Twins Supra, i'm sure you will all know the car. After Lee at SRD had completed some extensive work on the car, he dropped it off at mine for the car to be detailed prior to Steve's collection. I did not take any photos of under the bonnet as it was not part of the detail, however the work done under there was extremely impressive So, this was the car on arrival Being snowfoamed as a pre-wash Tyres, door/boot/fuel shuts and window trim all cleaned with APC, wheels with Bilberry, before being clayed and then washed via 2 bucket method using Shampoo Plus. Taken inside to be dried and have paint thickness readings taken. Not looking too bad, but the paint revealed its true condition when inspected under LED lighting and was really hindering the Supra's appearance
 -
Hi Tony, was great to see you, the Lambo and of course your lovely new centre over the w'end. Hope i havent made any of your decisions harder in terms of repainting or wrapping Very difficult choice with so many variables affecting your enjoyment from the car, and also its resale value as its certainly one of those cars that has the potential to be worth very good money if done right. I'll be going over the pictures i took with my colleague tomorrow and will be in touch. Speak soon mate
-
Cheers Tony New owner has been given some good tuition on maintanance and products
-
It was a great pleasure, to work on the Do Luck Supra, and for Jamesy. He's a fantastic guy that will do the car proud, for us all to appreciate back in UK events. Thanks for reading, Christian
-
Finally the car was wrapped under a sheet to await Jamesy's arrival When he came, we both applied the Do Luck sunstrip, as best we could This wasnt an easy task! These were the final pictures as the car was pulled outside to leave
-
The wheels, although really requiring a refurb, were polished up with NXT, ipa'd and sealed with Poorboys. Tyres were dressed with Endurance Gel The boot was hoovered and everything cleaned with APC The interior was hoovered and dusted down These were the final pictures after window seals and scuttle panel treated with Bumper Care
-
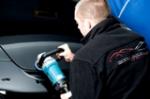
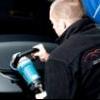
Then the A pillars and roof The carbon spoiler was also machined Once all polishing was complete, and all panels had been IPA'd to remove polishing oils, out came the box of Do Luck stickers to return the original graphics the car was known for. Each sticker location was carefully checked to its original place The glass was then cleaned using 3M Glass Cleaner The exhaust was polished inside and out Swissvax Cleaner Fluid was then applied by hand to the paint to prepare it for the wax application The chosen wax, was Swissvax Best of Show. Applied in a thin layer and buffed off after 15 mins
-
Onto the passenger door Polished side under LED light Unpolished side Passenger front wing had some lovely defects clearly visible Round to the bonnet and then front bumper
-
Moving onto the door The rear wing The blades of the carbon spoiler had to be removed to allow the machine full access Moving round to the other side
-
Paint thickness readings were taken. Obviously being painted the levels were noticeably higher than you would expect for original paint I chose to use Meguiars M205 polish, a 3M polishing pad and backing plate and the Makita rotary. Each panel required 2 hits of this process to achieve the results i wanted the car to leave with for a stage 1 treatment. The defects remaining would require a step up in compound to remove, which would need a stage 2 correction treatment. As the defects that remained had the edges taken off them during the process applied here, this hugely changes the way natural light hits them, and as you will see as the car develops, this will still leave an exquisite finish to the vehicle Starting on the front wing
-
The car was then jetwashed, snowfoamed, rinsed off after 5 mins and washed using Shampoo Plus, leaving this Being a mild day outside, the car was clayed using Last Touch as lube to remove bonded contamination washing would not remove The rear number plate was cleaned with Tar & Glue to remove the residue from a previous plate applied over the top After being washed again the car was taken inside to be dried and inspected, lots of swirls and faded paint was now very apparent
-
Starting off, the tyres were cleaned with All Purpose Cleaner Wheels with Bilberry, which is safe for all types of alloys, including chrome Calipers also cleaned with APC All door, boot, fuel shuts, window trim, lights and scuttle panel cleaned with APC
-
Here we have Jamesy's writeup for his newely acquired Do Luck Supra! The car was booked in for a Stage 1 paint enhancement, so not all defects will be removed in this process. As a general rule original Supra paint is quite soft, as this car has been fully painted it was a little unknown what the paint hardness would be like. I can tell you now, that its much harder So, taking a walk around the car lets see what weve got...
-
I'm not sure if it was done at Ferrari or the previous owner himself, but it did look naff. Hubs can only be black or silver imo
-
MK1 Golf Cabriolet Help
Invisible Touch Detailing replied to Invisible Touch Detailing's topic in Geometry
Very useful thanks mate, i will point my friend to this so he can have a good read and get some ideas. -
Hi Tony, i hope you are well mate. I'd like to pick your brains if possible please regarding a friends car. Its a Mk1 Golf Cabriolet (with a Jabba Sport tuned G60 Supercharged lump in ) He booked the car in somewhere local to him yesterday that uses a Hunter Hawkeye system and i went along for the journey. The car is extremely low, very hard ride, crashes on the slightest of dips in the road let alone a pothole! It also pulls quite badly to the left. The car was checked and came up with red everywhere! I'm going by memory here, but i believe the front camber was -0.08 passenger side and -1.57 drivers side, toe was i think something like 1.20 and 1.26, i really cant remember any other details i should have snapped it on my phone at the time. They looked underneath and said great, its a single sided adjustment for the toe. The adjustment was on the drivers side and when they altered this it only changed the drivers side and not the passenger also. They were completely stumped by this and said they did not know what was wrong or how to rectify and therefore could not help. I said could they fix the camber to at least help, but they said there was no point till this problem was rectified. So he left, a little annoyed that nothing had been done and is now wondering what to do. Have you got any ideas as what could be the issue? I have read that on mk1's something could be fitted so that he has seperate adjustment on both sides? They also said there was no adjustment they could make at the rear of the car at all. I appreciate he hasnt come to you, and i did explain in my eyes you are the geometry man so just wondering if there is any ideas you may have or if you just need to see the car. Many thanks mate Christian
-
The owners service book was completed to accompany his existing mechanical service history, and placed on the passenger seat The 430 was then wrapped under a sheet whilst we waited for the british weather to sort itself and the car could be trailored away, ready for an exciting road trip the owner had planned Hope you enjoyed the read, more to come from Invisible Touch Detailing soon... Regards, Christian
-
Meguiars Endurance gel was applied to the tyres These were the final pictures
-
The rear diffuser was also treated with Best Of Show The wind deflector was filthy and really impacting vision. This was removed, fully cleaned and replaced Previous polish on the rear brake light was removed with APC All glass was cleaned inside and out with 3M Glass Cleaner The interior and boot were hoovered and dusted down. The dashboard and plastics were then treated with Natural Look Any exterior rubbers, plastics and door/boot seals were treated with Bumper Care The following day, Zaino Z8 was applied to all paintwork, a panel at a time, evenly spread and buffed using several clean microfibres to further enhance the gloss, depth and add further protection to the vehicle. This product added an extremely noticeable difference to the overall appearance
-
The wheels were then removed to be fully cleaned, polished, ipa'd and then sealed with Poorboys Whilst the wheels were off, the hubs were painted black to cover up the red they had previously been painted Moving into the engine bay, all rubbers were treated with 303 and then all surfaces also treated with Best Of Show The exhaust was polished with NXT These were the completed pictures of the engine bay
-
The roof was then folded away to allow the areas underneath to be machined Changing to a smaller spot pad, i proceeded with the wing mirrors, A pillars, vent areas and paintwork inside the car where the rear seats had been rubbing. The vents on the rear wings were treated inside with 303 Each panel was ipa'd after polishing. Swissvax Cleaner Fluid was applied once all machining was complete to ensure a completely clean surface and prepare the paint for Swissvax Best of Show Wax