

Invisible Touch Detailing
-
Posts
294 -
Joined
-
Last visited
-
Days Won
1
Content Type
Profiles
Forums
Calendar
Gallery
Everything posted by Invisible Touch Detailing
-
 I hope you enjoyed the read and thanks for looking, Christian
 -
Tyre pressures were set to the manufacturers recommendations Finally, Zaino Z8 spray sealant was applied to the paintwork prior to collection These were the final pictures...
-
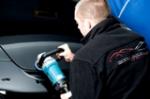
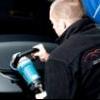
Once all polishing was complete i returned to the engine bay. Aerospace 303 was applied to a wet surface and allowed to dry naturally At this stage the rusted front number plate screws were removed and replaced as the vehicle could not leave with screws like this! Swissvax Cleaner Fluid was then applied to prepare the paint to receive 2 applications of Best of Show Wax The interior was dusted, hoovered, glass polished and Gliptone leather conditioner applied Endurance Gel applied to the tyres and sealant applied to the wheels The exhausts were polished
-
Paint thickness readings were then taken and a report produced at the customers request of any paintwork the vehicle had received It was decided to carry out a Stage 1 paint enhancement which i performed mixing the following 2 polishes via a makita rotary and a 3M polishing pad A few shots during the polishing process
-
The vehicle was in reasonable condition, but could be enhanced in many ways. A quick few shots of the paintwork in sunlight which showed swirls and was lacking depth and clarity The first task was the engine bay. Not wanting to get too much water within certain areas, this machine was used which is attached to an airline. The chosen product was APC mixed with warm water. The attached airline offers a controllable jet of air mixed with the solution to deeply cleanse heavily soiled areas in a safe way, using minimal water in the process. Fine brushes were then used to tackle more stubborn areas and then wiped dry. Once degreased, the engine bay will be returned to later in the detail. The wheels were cleaned with Bilberry and tyres with APC All door/boot/fuel shuts were then cleaned with APC. The vehicle was then jetwashed and snowfoamed Left to dwell and then rinsed After being washed via 2 bucket method, it was then clayed to remove bonded contamination, washed again and taken inside to be dried
-
Hi, Here we have a Bentley Continental Flying Spur recently brought to Invisible Touch Detailing. With the owner having recently purchased the vehicle, he was keen for it to be inspected and receive various treatments to bring out its true potential. This was the vehicle on arrival
-
The Invisible Touch E30 Track Car
Invisible Touch Detailing replied to Invisible Touch Detailing's topic in Car Blogs
cheers Tony, i will check this when i install. Hoping to get the rear end swapped over Saturday. Although only just realised i have no handbrake bits as they came from a car using a hydraulic setup. Am gathering the bits to sort this -
The Invisible Touch E30 Track Car
Invisible Touch Detailing replied to Invisible Touch Detailing's topic in Car Blogs
Driving is tricky, sat on a plastic stool it tends to slide as you pull away lol But it sounds good Few more bits done today Fitted the powerflex control arm bushes Painted the driveshafts, 4.10 LSD and gearbox -
The Invisible Touch E30 Track Car
Invisible Touch Detailing replied to Invisible Touch Detailing's topic in Car Blogs
It starts and drives -
The Invisible Touch E30 Track Car
Invisible Touch Detailing replied to Invisible Touch Detailing's topic in Car Blogs
Thanks Tony, we took a lot of care getting the subframe and the plates flat using a spirit level. Hopefully they will do the trick Bit more done today... Radiator fitted. Air intake fitted and sensors connected. Header tank fitted along with relay box. Only taped to the side for now as brackets need to be spot welded on for them as they were different items in this chassis originally. They also need to be removed once i know its running to paint everything. All fluids done. Exhaust fitted. I was keen to see if the downpipe cleared the modified steering coupler, which it does. I wont be using the rear section of this exhaust as there are no silencers at all, but it makes things slightly quieter for starting it. Passenger side hole in the floor is all welded up and sealed. Rear calipers all painted. E46 steering rack cleaned. Front subframe painted. Not bothering with the front control arms as they are being replaced anyway with new ball joints and bushes. I'll paint the new ones. Loom given a final check over. Negative lead for battery attached to the chassis. Fuel tank drained as this car has not been used for about 7 years. Fresh fuel put in. So, it was time to fire it up. Although we had a spark there was no fuel. After investigation, the fuel pump is not working at all. It was removed and tested but its had it. Not really surprising after all that time sitting there. Will get one ordered asap. Would have been nice to hear it running, but wont be long Few pics from today -
The Invisible Touch E30 Track Car
Invisible Touch Detailing replied to Invisible Touch Detailing's topic in Car Blogs
Christ knows! Doesnt feel like i'm anywhere near getting stuck in yet lol -
The Invisible Touch E30 Track Car
Invisible Touch Detailing replied to Invisible Touch Detailing's topic in Car Blogs
Forgot to add, a short shift kit was also installed -
The Invisible Touch E30 Track Car
Invisible Touch Detailing replied to Invisible Touch Detailing's topic in Car Blogs
Bit more work on the car today. The 325 gearbox was delivered, but unfortunately had 2 supports broken during transit. This was taken to an aluminium welder during the week and repaired. Came back looking great. So the old 1.8 box was removed and the 325 box installed. Along with a new Sachs clutch and the flywheel also being slightly lightened and skimmed. The rear subframe also had some camber and toe adjustable plates welded on. Hopefully these plates will allow enough changes to let Tony do his magic A few other bits and pieces were also done. Tomorrow i will be back to tackle some more.... -
The Invisible Touch E30 Track Car
Invisible Touch Detailing replied to Invisible Touch Detailing's topic in Car Blogs
Well the 325 gearbox will be arriving tomorrow. New Sachs clutch, powerflex trailing arm bushes and rear wheel bearings came today. Hoping to get the box in Saturday so i can then finish off the minimal engine bay bits left. Looking forward to turning the key and making sure the loom is all good -
The Invisible Touch E30 Track Car
Invisible Touch Detailing replied to Invisible Touch Detailing's topic in Car Blogs
Cheers Tony, have ordered the bits -
The Invisible Touch E30 Track Car
Invisible Touch Detailing replied to Invisible Touch Detailing's topic in Car Blogs
Cheers mate Tony, i've been doing some reading. I know the below is a long winded article, but is this the type of adjustment i would need fitting to the rear subframe http://www.strictlyea.com/forum/viewtopic.php?t=3600 Would be really grateful to hear your thoughts as it makes perfect sense to tackle this issue with my subframe currently removed. The suspension setup will be in your hands once complete so i'd hate to turn up with something that you say doesnt help Cheers mate -
The Invisible Touch E30 Track Car
Invisible Touch Detailing replied to Invisible Touch Detailing's topic in Car Blogs
Hi Tony, i presume its the rear that needs adjustability sorting? I have read that adjustable plates can be welded to the rear subframe to allow this. What would you recommend i do? -
Hope you enjoyed the read... Christian
-
New Porsche decals were also applied Although soon to be replaced, whilst the wheels were off they were given a good clean inside and out. Being on the ramp and having a good view underneath, it would have been criminal not to give the stunning exhaust system a really good polish. Sadly i forgot to take finished pics of it! The paintwork was fully wiped down with IPA to remove polishing oils allowing the finishing products to bond better, increasing their durability. After discussing options, it was chosen to firstly apply 1 layer of Collinite. This was buffed off and left over night to fully cure The following day i applied another layer of Swissvax Best Of Show Glass was polished, plastics and tyres dressed. The interior was hoovered and dusted. These were the final pictures
-
Proceeding around the Porsche Onto the beautiful carbon spolier Once all polishing was complete, i turned to the calipers. As quite often seen with these, the lacquer was beginning to peel. Several options were available to this from rubbing them down to remove the peel thus creating a good key and then hand finishing, to completely stripping them and powder coating. If the latter was chosen it would obviously make perfect sense to also use a rebuild kit in the process. As they were functioning fine, the first option was chosen
-
It was then snow foamed before being washed by 2 bucket method using Shampoo Plus Then dried and taken inside for paint thickness readings. Many readings were taken per panel, the higher numbers showing clear evidence of previous paintwork The paintwork was then inspected under halogen and LED lighting Polished with the Makita rotary, 3M polishing pad and backing plate using Meguiars 205 as the primary polish, with a small amount of #83 to give a little more bite
-
Hi, Here we have Amir's recently acquired Porsche 996 Turbo, with a few extras of course The car is now producing a monsterous 650hp at the wheels! The car came to Invisible Touch to recieve a stage 1 paintwork enhancement with 2 applications of protection and a caliper refresh. This was the car on arrival... Firstly the car was jetwashed and then many areas cleaned with APC and fine brushes were washing alone would not reach
-
The Invisible Touch E30 Track Car
Invisible Touch Detailing replied to Invisible Touch Detailing's topic in Car Blogs
Today i cleaned up and painted the other rear trailing arm, so all the rear end is now painted. Removed the rear beam bushes and replaced with new Lemforder items. Removed the 4 trailing arm bushes, these were fun! but some heat soon fixed that. Ordered powerflex for these which should be here early in the week. Some Pagid rear discs arrived. I wont fit these until a later date as i dont want the car sitting around over the coming months corroding them. Stripped down the rear calipers, made sure the bleed nipples were free ready for when i install fresh brake fluid. Removed any rust on them and sprayed them with smooth black hammerite so it will match the WMS fronts. Next on the cards is to obtain a 325 gearbox so i can then install the propshaft and these rear end items i have been working on, get the radiator fitted as i didnt want any risks of the fan catching it doing the gearbox, make some final loom checks and then i think it should be ready to turn the key